One of my favorite things to do is to take a peek inside organized, beautiful
craft rooms. Although I'm not as good as I would like to be, it's fun to see other
craft room ideas in the hopes I'll find a few organization or pretty tips that I can use.
Today, I wanted to let you come tour my craft room and take a peek behind the scenes. Maybe you'll find some ideas that you can use.
My craft room is set in what I suppose is considered to be the breakfast nook off the kitchen. It seems kind of a strange set up to me since on the other side of the kitchen is the actual dinning area (with the better view so that's where everyone wants to eat.)
I never quite knew what to do with this area. When we closed the store, I decided to turn it into my craft room so that I could work while being close to the kids. It's worked great (except for the fact that the kids are actually trying to take over!)
I have four black Walmart bookcases along the long wall to put all my "crap." On top of the book case is where I keep a few of my favorite things.
We like to do puzzles in my house, so we have five puzzles framed, with my "Life is short" wall hanging in the center.
In front of the puzzles are just a few things that I love. I have
Lumiere, a sucker tree decorated from my daughter's
mustache party, two of my favorite
Divergent quotes, a few cake stands, an M&M stuffed doll, my cupcake wrappers, and a gumball machine.
I use recycled jars and boxes for my organization since they are free and come in such fun styles, so you'll see a lot of those in my craft room, as well as the cheap shoe box sized plastic containers.
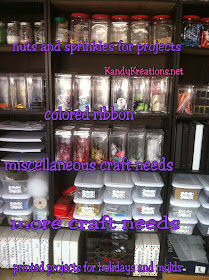
On this first bookshelf is where I keep most of my candy for crafting.
The top row has individual gum packs and suckers in recycled chocolate raisin containers from Sams club.
I like to make a lot of candy crafts, so I always need certain types of candy on hand (kisses, M&Ms, and such.) I keep these on the second row in plastic jars I purchased for my candy store from Walmart. (Yea, these aren't so cheap but I had a bunch when we closed down the store, so I used them.)
The next row has notebooks where I keep my favorite recipes, my financial information, and other important stuff. I am using old family sized Lucky Charm boxes to hold my different magazine subscriptions here. I am looking for a polka dot wrapping paper to decorate these, but haven't found any yet, so they are still sitting "un-beautified".
Below them in the shoe box containers are different sized bags that I use. While the bottom shelf is kind of the catch all for my shelf. I have a box with plastic canvas scaps, a box with whirlypops awaiting another order, and boxes filled with chocolate molded candy that I need to picture and list in my online store.
The second shelf has more recycled peanut containers filled with nuts and sprinkles I use for my baking projects. I like to have lots of different colors and styles since you never know when you'll need to make a quick project for a child that has forgotten he needed something TODAY!
Below that in more acrylic containers is part of my ribbon stash. I have a lot of ribbon, so I categorize it by color and size. These containers help me to be able to quickly find the ribbon that I need without having to go through everything I own, so I LOVE that.
Then I have two shelves of craft "crap." I have crazy things such as balloons, craft sticks, paint brushes, and crazy sized paper in these two shelves.
Below that, I have recycled fudge boxes where I have different printed projects for the holidays. Since I do a few craft shows a year, I try not to throw away things that haven't sold out, so I can reuse them the next year. Or if I have an idea that I started, but didn't get completely done before the holiday rolled on, I'll put it in these boxes until next year.
The black milk crate has my favorite silicone molds in it. The rest of my candy molds are downstairs, but I find there are certain ones that I use alot during specific times of the year, so this is where I store them so I don't have to take the stairs too many times a day.
The third shelf holds most of my crafting essentials.
The top area has mason jars filled with items like my homemade Modge Podge glue, flavors for hard sucker candies, and candy eyeballs.
Below that is more ribbon. (Told you I had a lot.)
And then comes my real essentials. I went to an auction at a local college in Indiana and bought a box of paper sorters for about $2.00 before we moved. These have come in very handy. I can sort all of my paper by style and color. That way I don't grab some expensive photo paper instead of a piece of card stock when I'm working on a project and not thinking too much.
The boxes have my scissors, my pens, tape, glue, stamps, and such. I use these boxes ALL THE TIME. It's so nice to have them organized and easy to get to. I also keep my bubble wrap and (suprise) more ribbon on this shelf.
Below that is more of my specialty paper and printed projects in the fudge boxes. I created labels with fun polka dots and large wording so I would know what was in each box and hopefully find things a lot quicker. (It works well if I remember where I filed what I'm looking for.)
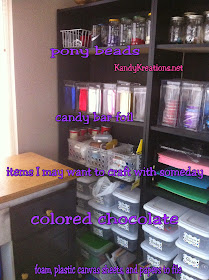
The last bookshelf is kind of tucked between the wall and my work table, so it has things that I don't use all that often.
The top shelf has pony beads sorted by color into old spaghetti sauce jars. The second shelf has my candy bar foil jarred by color. The third shelf has items that I may want to craft with some day (so you can see the many pringles containers hiding back there.) The fourth shelf has colored chocolate sorted into shoe box containers. While the bottom shelf has my large foam sheets, my foam shapes, plastic canvas sheets, and items that I need to file.
Are you still with me? Or have you yawned off in boredom? If so, I only have a few more things to show, then you can take from this craft room tour what you will and move on.
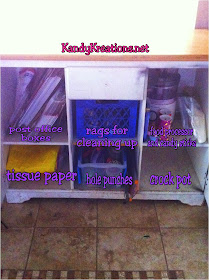
Below one of the big windows in this area, I put the bottom half of a cabinet that I purchased at a garage sale a few years ago. It has worked better here then it ever did in my kitchen holding dishes.
The top counter allows me to take pictures filled with natural light (sometimes even too much light.) While the inside is perfect for some fo the larger items that don't fit on my bookshelves.
To the left of the bottom half of the cabinet sits the top half. I have it covered with a black tablecloth so I can hide all the shelves underneath. They hold my Xyron machiens and all of the different cartridges I need for them.
The top has a more work space (which is currently filled with a box of tiles that I need to ship out.) My glue gun sits here with my Craft Robo and more ribbon.
You can just barely see my son's computer on a table sitting on the other long wall in front of another window. We both have our computers and my printer here. It's nice because he can sit beside me and we talk while I'm working. I can see what he's doing and he feels like he's right in the midst of things helping. (I do ask for his opinion a lot so he enjoys that -most of the time.)
Let me leave you with the inspiring view outside the window in front of my computer. I never get tired of the mountains and the beautiful sunrises that I get to work by every morning. Sometimes it's a little distracting, but it's nice to have the reminder of the beauty outside my craft room too.
I hope you were able to get some craft room ideas from my craft room tour today. If not, I hope you enjoyed the guilty pleasure of just looking around my room with me. Now go and create something today!


