Countdown to Halloween with a fun Plastic Canvas Halloween countdown calendar. This calendar uses easy plastic canvas stitches to create a spectacular calendar that you can use to excite your kids and family for the Halloween holiday.
I love countdown calendars! I believe that half of the fun of a holiday is the anticipation and excitement building up to the "big day". Don't you?
I have made it my "mission" in life to try and find one new Christmas countdown calendar each year to add to my collection. But last year, I decided I needed one for Halloween too. After all, it is my favorite holiday, so why not enjoy the countdown to Halloween too?
This year, I decided at the last minute to create another Halloween countdown calendar. And this time, I made it out of my favorite medium--plastic canvas!
I am so excited with how it turned out. Plus, I made it with two options. You can fill it with fun size candy bars or there's a pattern for a little ghost that can move from day to day to countdown to Halloween.
It looks like it would take a while to create, but don't worry, it really doesn't. I made mine in about a week, but that was with stopping every 4 pockets to design up new ones. So it probably would only take a few days with a little binge watching.
So really, it's not too late to make one for this year, but definitely not too late to make one for future family traditions! Or for gifts....
hmmm.... I hadn't thought of making them for gifts for my nieces and nephews. What a fun idea. Thanks, guys!
To make the countdown calendar, you're simply making little pockets and then sewing them together. Find the complete countdown calendar pattern in my printables shop here.
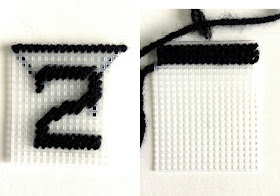
The designs are simple stitches using continental and Goblin stitch. The numbers are all a slanting right goblin stitch which is super easy to sew with the pattern. Then you can go in and fill the outer edges with the continental stitch. The top of each box is overcast with the same color that I used for the number of each day.
The top and back side of the box is a simple stitch of continental in three quick rows.
Once all your days are sewn, start with day 2.
Lay the front number on the back box template lining up the top of the number side with the bottom of the rows you sewed. Sew the date front and the back of the box on the right side together. Using that as your starting point, sew the next date and side together on the other side. This will give you a line of 5 dates with the top of the box open and the bottom of the box open.
Remember to start with 2 and sew 3, 4, 5, and 6 together. Then start a new row for 7, 8, 9, 10, and 11. Continue. Day 1 will be sewn on to the header.
This will give you 30 days all sewn together.
The top header is a simple continental stitch in the same colors as each of the box. Simply sew it according to the pattern but leave the spot open for day 1.
When done, sew the left edge of day one onto the header, using the blank spot on the pattern as a guide. Then sew the header to the top row of your days catching the header and day 1 to the top of the box templates on week 1.
Overcast the top and edges of your whole countdown calendar.
It may sound complicated, but it's really not. As long as you know basic plastic canvas stitches and how to overcast things together, you'll be able to make this easy Plastic canvas Halloween countdown calendar for your family!
The pattern to make this Countdown Calendar is in my Printables shop in the Plastic Canvas section. If you love my patterns, please consider purchasing and making this so I can continue to convince my husband to let me purchase more craft supplies and keep designing!
If you like this idea, be sure to check out all the Plastic Canvas Patterns here:


That turned out so cute!!! It must have taken some time though!
ReplyDeleteThis is really cute! Thanks for sharing at #HomeMattersParty
ReplyDeleteI never knew that there were Halloween countdown calanders, looks cute #alittlebitofeverythinv@_karendennis
ReplyDeleteHow cute! Halloween is one of my favorite holidays as well! This will be one of my features this Saturday at the Snickerdoodle link party! Stop by for a visit! Roseann from This Autoimmune Life
ReplyDeleteCute idea and one all kids would love! Nothing like getting candy as you want for the big candy day itself, LOL.
ReplyDeletewe are big fans of Halloween here, maybe even more than of Christmas. My daughter would love this #lilbitofeverything
ReplyDeleteThis halloween countdown calendar is darling. Thank you for sharing at Sew It Cook It Craft It.
ReplyDeleteJust a lovely idea for Halloween … I know my kids will love it .
ReplyDeleteThanks for sharing it with us at #alittlebitofeverything