This post may contain affiliate links. When you click on a link, you are supporting DIY Party Mom, my family, and our blog fun. Thank you for your love and support!

Shindig Saturday Weekly Linky Party #10

I am devastated and hurting for all those in pain this week as they look around them and survive the aftermath of the deadly storms that have ripped apart so many lives this week.  I pray that you and your loved ones are safe and will have hope as you pick up the pieces of your lives..

This week has had me counting my own blessings as I look at the pictures of devastation and deal with a few stresses in my own life.

In June of 2008, I took my kids and went to visit my family for a small summer vacation.  My hubby had to stay home due to work, so it was just me and the kids.  A few days into the trip, I received a call from my husband saying the area we lived in was flooding.

My husband had called to say he'd lost his car that morning as the engine flooded on the road to work.  He had started to float away on a low spot in the road and he'd had to leave the car.  That was at 5 in the morning...we didn't know what was to come.

I quickly turned the TV on and found pictures of devastation in the whole area.  It was terrible for so many.
I called my friends and they tried to get to my house to see what was going on.  But this was my neighborhood.

They couldn't get to my house.  My husband was stuck working a double shift at work since so many in the area couldn't make it in to work due to the roads.

When he got off at midnight, he came home to find our house under 2 feet of water.
It was a crazy time. 
We were blessed to have many friends who came and helped to clean the mess.
I was blessed to have been away with the kids, when it all happened.
Many of the children in my neighborhood were racked with nightmares for weeks after.  They'd had to swim out of their homes leaving everything behind.
We were blessed.

We ripped everything down to the studs and began to rebuild.
Many of our neighbors just walked away from their houses.  We tried to stay.

We did much of the work ourselves, thanks to wonderful friends and family.
But our flood insurance didn't help.
After everything, our flood insurance decided that because we had a tri-level home, the living area was considered a basement and they didn't have to pay to fix it.  We'd had an "error" on our flood insurance saying we were covered.  We weren't.  FEMA would only pay for 2 feet of drywall and nothing else.
No replacement on the walls, the paint, the carpet, the furniture, or anything.  We were on our own.

It's been hard.  We are struggling financially due to everything.  And now, the housing market is in the toilet.  It's time for us to move.  I don't know what the future will hold for us. But I can see MANY blessings in my life.  I have seen many struggles since living here and going through this, but there have been so many blessings.  So many reminders that I am not alone.  Reminders that there are good people out there still.

My prayers go with those who are struggling now due to the devastation of the crazy weather we are having.  It's hard.  I know.  But have hope.  It will get better.  There is Someone watching over with a Divine Plan.

Now, that I've shared this crazy story with you...let's party.

The winner of this week's Teacher Jesters Jar is....

Lady Behind the Curtain who shared these yummy Rugelach cookies.  I have never seen this type of cookie before.  They look so good.  I think we may have to try them next week on Cookie Friday.  My kids love cinnamon and sugar, so I think these would be a great addition.  Plus, it will be good for them to try a new staple (they aren't very good with change and new things.)

You should really go check out her blog.  She has LOTS of cool ideas on so many different topics.  I love the Teacher Appreciation gift she made for only CHEAP using many things you may already have around the house....or you might after a trip to your local Sonic.  (Darn, as if I needed a reason to run get myself a Cherry Limeade!)  Be sure to also check out  her Mother's Day Brunch table.  I'm not usually a Shabby-chic kind of gal, but I LOVE this set up.  Using normal household items in a new way is such a cheap way to furnish and decorate a party.

Definitely go check her out Lady Behind the Curtain's blog and see some great Entertaining ideas!

In honor of Mother's Day coming up, this week's party favor is going to be a Mother's wall plaque.
"My greatest blessings call me MOM".  This plaque would be a great gift for any mother.  Sometimes we need that extra reminder that these little ones under foot are a great blessing!  You can keep this plaque or gift it away to another mom.


To ENTER, just join our Linky Party by sharing your favorite party themed craft, table scape, photo, favor, or whatever! I'm pretty flexible since just about everything can be used at a party...that's the great thing about us moms! We can see the potential in ANYTHING!

(We'll use a random generator to pick the winner next Friday evening.)

Linky Party Guidelines:
* Link up to your OWN project post, not just your blog, but your actual post. (We want to see it!)
*Grab a Shindig Saturday button for your post or blog page. (Hey, it benefits us all!)
*Stay and enjoy the party by visiting and commenting on other's projects. (It's fun to mix and mingle!)


Yarn Ball Decoration Lights

This is another one of those projects that I started "HOPING" that it would turn out.
Who knows when you are making things up, but in my head it was so cute...

I started with some water balloons, Elmer's glue, and 2 shades of purple yarn.
I DRENCHED about 2 yards of the yarn in glue.
Then I wrapped it around a blown up balloon.
(I thought I had some MESSY pictures of this stage, but my camera is telling me the pictures are empty files, so you'll have to imagine me covered in glue spending an hour wrapping these balloons.)

Then I let the balloons sit for 2 days.
It's been VERY wet here lately, so I let them sit extra long just in case.
(I've also been pretty busy with some family matters, but we'll pretend it was deliberate.)


After 2 days, I popped the balloon and pulled it out of my yarn ball.

There were a few balls that had become malformed as the balloons lost air.
But it was easy to reshape them when I got the balloons out so don't worry if you try and they look funny as they are drying.
Also, they made weird noises as they deflated-- so don't spend forever trying to figure out what that "strange sound" is when your kids come running to you about it.


I finished my lights by adding them to a strand of mini Christmas lights.
I put the lights inside the ribbon balls in an area where the ribbon was very close together.
Most of them stayed without help, but I did need to add a little hot glue to one or two to make sure they stayed when I hang them.

TA-DAH!
(Yes, feel free to be amazed and wowed at my amazing picture.)
But seriously, I wish you could see how cute they really turned out.

I plan to put these above my dessert table at the party.  I think they will be just the touch of whimsy that I'll need to tie it in with the rest of the party.
What do you think?

Tinkerbell Fairy Door Welcome Sign

Welcome to our Tinkerbell Fairy party!

This fun sign will sit at the door to welcome guests into our birthday party.
It was really easy to make and looks pretty cool sitting on my front door.

I started by printing out this design and cutting it out so that its a full page size.

I took my sign and outlined it on white foam board.
Then I cut the foam board shape out using my Hot Knife.

I simply ran my sign through my Xyron to turn it into a sticker and placed it on the foam board.
I added holes in the top corner and tied a ribbon.

It looks pretty cute and will welcome the guests into the Tinkerbell party in style!

I also forgot to show you the invitation we made for the party.
It's the size of a postcard so it can just be addressed and mailed.
Simple and easy.

Tinkerbell Party Favor Box & Giveaway

There are so many cute party favors you can have for a Tinkerbell or fairy party.
I had a hard time narrowing down which ones to have on my party favor table.
But these are my favorites...

 Each girl will have her own set of Fairy Wings to enjoy.
I'm sure the girls will love to prance around the party and play dress up at home later with these beautiful wings atop her shoulders.

Each little girl will get to take home a personalized name plaque for her room with Tinkerbell watching over her each night.

I'm also planning to make these cute little boxes with Tinkerbell on them.  They can be personalized with any greeting the birthday girl wants and are going to be filled with Hershey kisses personalized with Tinkerbell graphics and sweet sayings.

Our little Fairy Princess is going to have kisses with her name and "Tasha's 7th Birthday" on them.  Plus pictures of Tinkerbell, for a total of 4 different designs.

If you want to make your own favor boxes, you can easily do so out of cute scrapbook paper.

Take a piece of cute paper...I have this Glitter Stock Set and I use it for ALOT of projects.
(Can I say I LOVE it?!?)


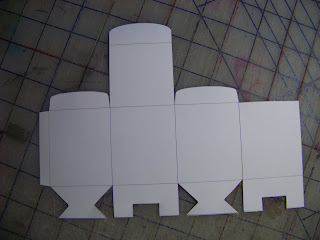
I cut it down to run through my printer and printed off a box template on the white side of the paper.
There are a lot of templates out there, so you can choose...but I recommend
JersGirl's templates.  I've always been happy with hers and she has a HUGE selection, so check her out.
You can get this votive holder template HERE.

Cut it out around the outside lines and score on the insides.

Fold along the score lines and glue together for a cute box.

You can embellish with cute scrapbook elements and fill with sweet treats!

Now for my request and giveaway....
This little girl's party isn't for a couple of months, but I'm trying to get it all set up now since I'll probably be moving soon...so I don't know who the guests are going to be yet.  Since I'm taking pictures so the mom can set up the party by herself, I need to make a few plaques to show her what to do with them.

And YOU benefit.
(If anyone wants one...)

I'm looking to make 5 Tinkerbell plaques...if you would like one with your little girl's name on it, please leave a comment here.  I'll pick 5 winners on May 4 at noon (EST) and make those plaques up.  After the photos on Friday, I will mail out the plaques to each of you.

If you would like one:

1) Leave a comment here telling me what name you would like on the plaque.
Don't forget to share your email so I can contact you if you win either by linking up your account, or giving me your email!

For extra entries...

2) Visit my Facebook page and become a Fan, then come back and let me know.
3) Visit my Store and come back and tell me your favorite project.
4) Become a follower on my blog and let me know you are!

I hope you guys are interested.  This is one of my most popular plaques...and I hope you'll help me out and let me share it with you!

Purple Pennant and Ribbon Banners

Every little fairy needs to have their name on a pretty pennant banner on their birthday!

So today I created these banners for the Tinkerbell party favor table.

I used the same method that I used for my Chef party Sweets banner to create the little girl's name banner.
I used a light purple card stock for the name's letters and the pennant triangles and a darker purple for the circles under the letters.  Then I glued the pennants to some Walmart light purple ribbon.

Behind the party favor table I created a ribbon banner.

I purchased a Ribbon Jar from Hobby Lobby (50% off of course).  The jar had one yard of 15 different types of purple ribbon.  I cut the ribbon into 6 inch lengths and glued to a white Walmart ribbon.

On the party day, I will probably use a touch of hot glue to secure the ribbon across the banister, but for now, I just taped it.  Not real great for pictures, but it still looks cute, don't you think?

Wait until you see the cute party favors I'm going to line up on this child size favor table!
So cute!
And if you're lucky...I may just have a few to share!

Tinkerbell Fairy Party Ideas

I had a wonderful Easter yesterday.
I really did.
We enjoyed having friends over and had a yummy Ham dinner with TOO much food.
It was great.

But I'll be honest....
I'm glad to see Easter go.
I'm kind of tired of looking at bunnies and eggs.
I'm ready to move on.
I'm not quite ready to leave the pretty, romantic colors of Spring though...
So this next party is going to be a Tinkerbell Fairy birthday party for a sweet little girl.
Lot's of pink and purple, and pretty flowers suitable for any fairy princess.

So here are a few party necessities from the small businesses of Etsy....
I hope you'll support these wonderful men and women!

Tinkerbell Fairy Treasury
Ribbon Wand - White and Pink...

$9.50
Flittering Fairies - DIY Bir...

$8.00
Hot Pink Glam Tutu/Hairbow S...

$27.50
Tinkerbell Fairy Dust Neckla...

$7.00
Purple And White Ball Yarn S...

$19.00
Fairy Crown Party Favors - B...

$3.75
Fondant Cupcake Toppers - Wo...

$13.95
12 Fairy Cupcake toppers

$9.00
Six Fairy Dancing Rings - Gr...

$38.00
Chocolate Filled Toadstools ...

$73.92
Wonderland mushroom Pinata (...

$45.00
Flower & Butterfly Felt Birt...

$20.00
Do it Yourself Fairy Kit

$15.00
Custom Printable Disney Fair...

$13.00
Fairy Tea Party Cupcake topp...

$17.00
Custom Princess Wand

$5.50