This post may contain affiliate links. When you click on a link, you are supporting DIY Party Mom, my family, and our blog fun. Thank you for your love and support!

DIY LifeSaver Candle Stick with Free Printable

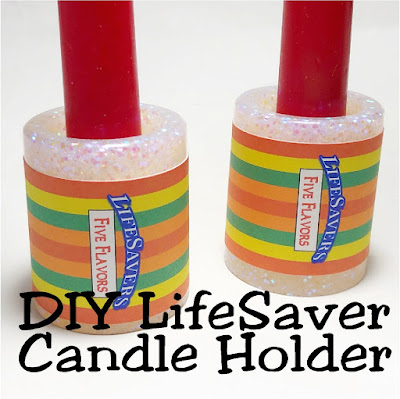
 Create a unique and fun candle holder for your Valentine's day party with this easy resin craft with free printable.  These LifeSaver candle holders are the perfect addition to any sweet dinner party or table

Create a unique and fun candle holder for your Valentine's day party with this easy resin craft with free printable.  These LifeSaver candle holders are the perfect addition to any sweet dinner party or table.
The one thing that I think I like most about 2020 is that it has helped bring my family together at dinner time.  When the kids were little, we had family dinner every night (even if it meant eating at 4 pm before Football practice.)

But somehow, we managed to get away from that.  I guess that's life...the ebb and flow of traditions and what works and what doesn't.

Now that we manage to have it together a little more often, I am trying to get back in the flow of having fun themed family dinners.  I loved the Hocus Pocus Halloween dinner we had and the Back to Hogwarts one was definitely a favorite.

Create a unique and fun candle holder for your Valentine's day party with this easy resin craft with free printable.  These LifeSaver candle holders are the perfect addition to any sweet dinner party or table.

Now I'm working on a "Love is Sweet" dinner party for Valentine's day.  It's going to have a candy themed table.  Suprisingly, I haven't been able to find many candy themed dishes for my table.

So I decided I needed to make a few.  Fortunatly, I've taken up a new hobby in Resin.  And these DIY Lifesaver candle holders were a simple way to get started.


To make these candlesticks, you'll need:


Every brand has a different ratio to use in your resin pack, so be sure to read the directions for yours.  With this resin brand, it's a one to one ratio.

I filled each of my cups to the same line with equal amounts of hardener and resin.  Then I combined them into one cup.

Mix well.  Be sure to mix 3 to 5 minutes or until there are no streaks in your resin. 


Pour the glitter in your cup and mix.

How much glitter you use and what color depends upon you.   I used lots of a bright white glitter.  If I had wanted the LifeSaver candle holder to look more real, I probably should have used a silver glitter, but I love the white and wanted to be able to use these candlesticks for more designs on later tables.

If you have a heavy glitter, wait about 30 minutes to an hour after mixing to add the glitter in to your resin.  I've found that the heaver glitter has a tendency to sink to the bottom as it hardens up.  But you'll have to watch it because the resin starts setting up the longer it sits and mixing in will be a little difficult the longer it sits.  It's a bit of trial and error so I can't tell you exactly how long to wait.


Once your resin is glittered to your heart's content, pour it into your shot glass mold.  You definitely want to make sure you use a silicone mold so that it's easy to pop out when it has hardened.

Let your mold sit on a well ventilated, flat surface for about 24 hours.


When the resin is hard, pop out of the mold. 

You will probably find that the bottom of the piece is a little rough.  Rub it in circles along a piece of sandpaper to help soften the hard parts.


Print the LifeSaver candle holder design (found below) on to card stock.  Cut around edges.

Wrap around the middle of your candle holder and glue closed.  Center the design on your candle stick holder to look like a pack of LifeSaver candies.


Depending upon the size of your candle stick, you may find the opening in the holder to be too big.  I bought my candlesticks from Dollar Tree so they were slightly too small.

I wrapped a piece of toilet paper around the bottom of the candle and it fit perfectly inside the candle holder.  

An added benefit of this is that when the candle drips, it will drip down the candle and land on the paper instead of the candle holder.


Place your LifeSaver candle sticks on your table and enjoy!

Be sure to stick around for more of my Candy table DIYs.  It's going to be the sweetest Valentine's table I've done yet.  Yummm!

Right click on the LifeSaver printable below to save it to your computer.


Also, don't miss out on our Valentine candy bar wrapper freebie!  Drop your email so I can send it to you today.


Get this printable Valentine Card & Gift Candy Bar Wrapper

    We respect your privacy. Unsubscribe at anytime.

    2 comments:

    1. This is amazing and so creative! I love the whimsy of the lifesavers, too! Thanks for sharing and linking with me!

      Shelbee
      www.shelbeeontheedge.com

      ReplyDelete
    2. I've been wanting to try out resin art for last 3 years but could never get myself to try it out. Your tutorial made it seem so easy ! Excellent idea too. Visiting you for the first time - looking forward to browse more of your creative projects.
      Thank you for sharing your post with us at Meraki Link Party.
      Have a wonderful week
      Naush

      ReplyDelete