This post may contain affiliate links. When you click on a link, you are supporting DIY Party Mom, my family, and our blog fun. Thank you for your love and support!

Let It Snow! Winter Party Dessert Table

The weather outside has been pretty nasty this week with school delays, cancellations, and LOTS of snow, but inside has been a different story.  The winter has been a little brighter as we prepared for our Let It Snow! Snowman party.  The kitchen has been warm and cozy as we prepared yummy goodies.  And now it's time to share with you our Winter party Dessert table!

We've got LOTS of pictures of our sweet Snowmen, so sit back and try not to drool on your keyboard.
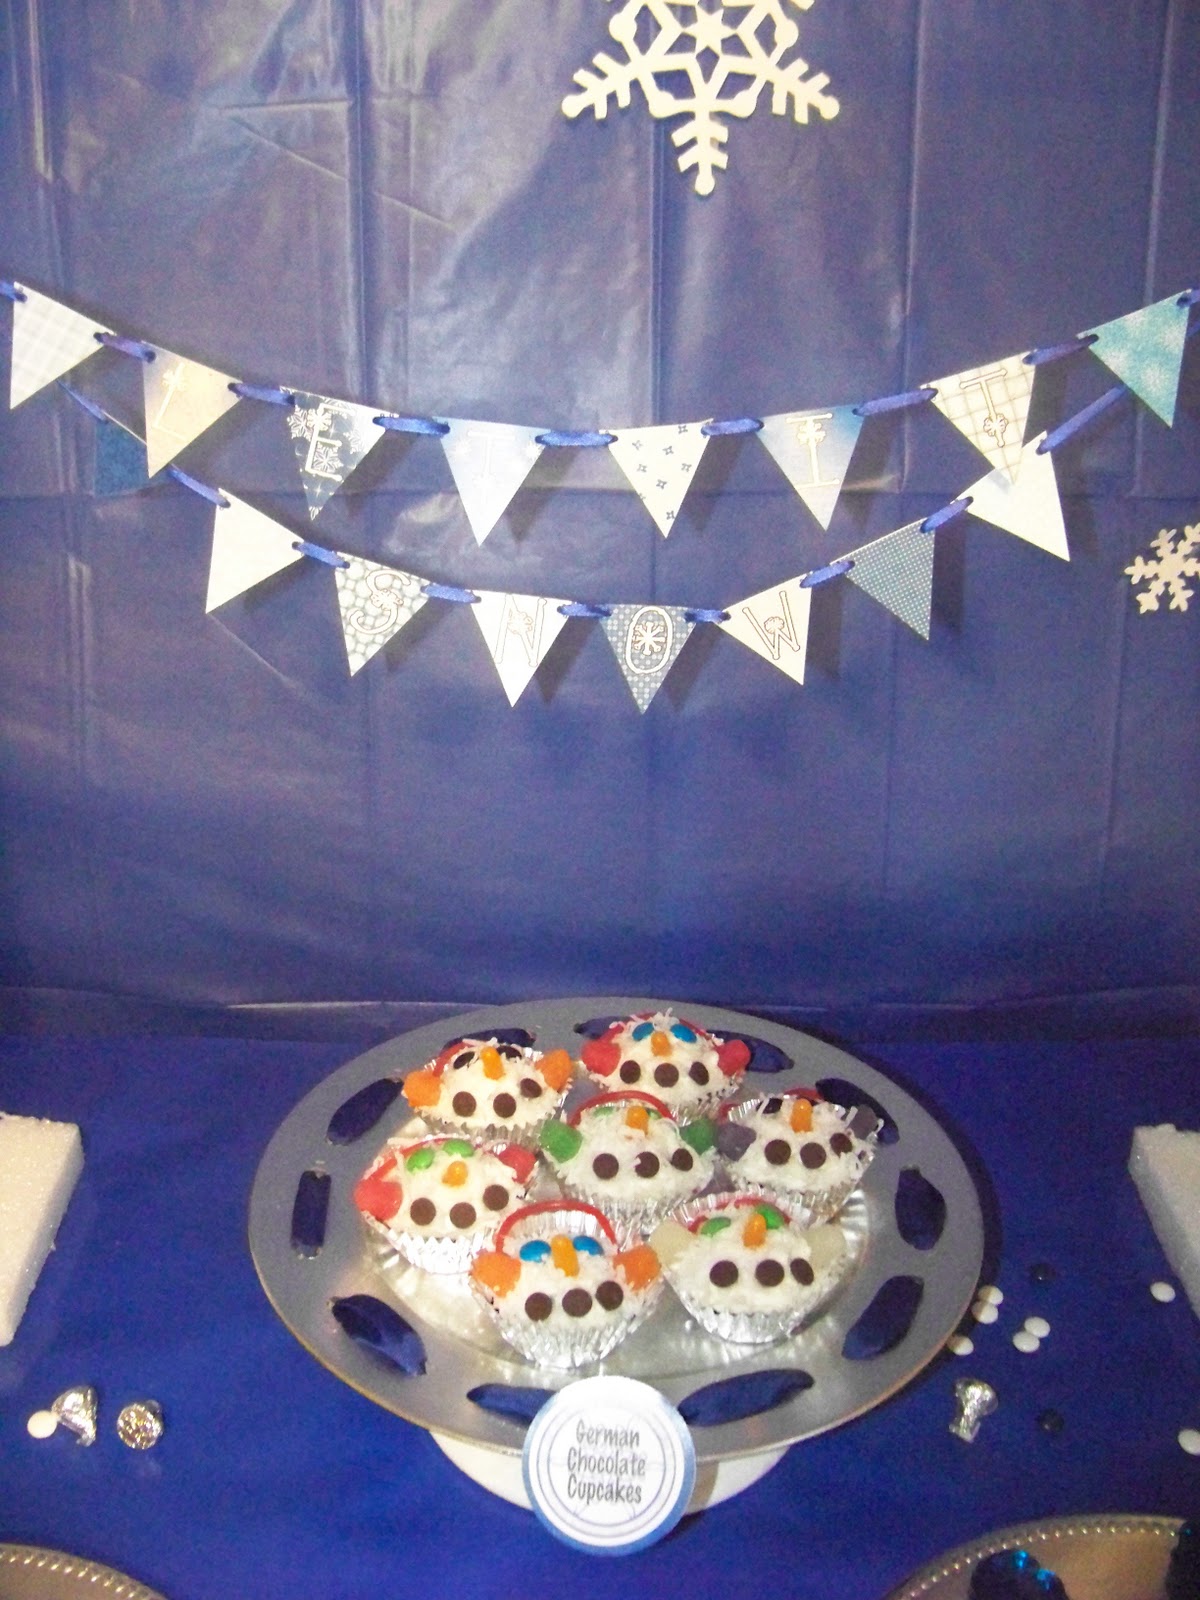

There's just something about snowmen that makes me think of a cold, night sky, so the colors of our Dessert table are a royal blue and white and silver accents.  I didn't want to spend a fortune on buying a tablecloth that reached all the way to the floor.  (JoAnn's has fabric that is 108 inches wide and is perfect for this, but it's ALOT of money per yard.  Even with a 50% coupon, it's still about $30.00)  So I purchased a $4.00 white twin flat sheet from Walmart and placed it so it covered more of the front of the table than the back.

The tablecloth just barely fit my 8 foot table, so I bought a roll of royal blue wrapping paper from Walmart's party section ($2.50) and rolled it out along the top of the table and down the sides a little.  This gave me color and length, for cheap.

The backdrop is a cheap $1.50 tablecloth in matching blue from Walmart's party isle.  I hung it from a PVC pipe fame that I made to sit behind the table.  I tried to hang snowflakes from the top of the pipe frame so they looked like they were falling, but the snowflakes kept sticking to the backdrop with static cling.  So I just taped them randomly around the backdrop instead.  (Way easier instead!)


The center of our dessert table was the yummy Snowman cupcakes.  They were featured on a silver platter that we made to showcase matching ribbon.  (I've always wanted one from Hobby Lobby, but the price was too much, so I made my own!)


Above the cupcakes is a mini blue and white pennet banner that reads "Let It Snow".  The banner is held up by two twin snowmen with matching blue hats and scarfs that are sitting to each side.  The snowmen were made with Styrofoam heads and clay pot bodies.  (I'm not a good painter, so I wasn't brave enough to draw them faces.)  They are sitting atop a piece of Styrofoam that I pushed 2 PVC pipe into.  At the top of the pipes, I drilled a hole to string the banner ribbon through.


The rest of the dessert table was filled with Snowmen and Snowflakes in various forms.

We had Chocolate Covered Oreos


We had Blue Jello Jigglers


Chocolate Covered Pretzels


Popcorn in Snowflake Cupcake Wrappers


And my favorite...

White Chocolate Bowls with York Peppermint Patty Minis


I saw the idea for these HERE.  They were super easy and fun to make.  Simply dip a partially blown up water balloon in white chocolate and place on wax paper to dry.  The drip from the chocolate makes the base.  When dry, pop the balloon and peel out the pieces.  Then draw on the Snowmen faces.  (I purchase the edible food markers, but they didn't work too well on the chocolate.  So I ended up using melted colored chocolate to draw on faces.)


To finish off the table, I sprinkled blue and white York Peppermint Patty minis and silver Hershey kisses around the table.

YUMMY!


Snow Party Games

If the weather cooperates and gives you lots of snow for your Snowman party,
the easiest and best idea for party games is to go ENJOY the outside!

Go build a Snowman.

Go sledding.

Have a Snowball fight.

Or, if you are creative and artistic, fill a spray bottle with water and a few drops of food coloring.  Now spray the snow to create fun, artistic designs.  Use different colors for full effect and make yourself a Mona Lisa!

If the weather isn't as cooperative, there are still lots of games you can play inside.  Take many of your childhood games, and adapt them to Snow themes.

You can find lots of coloring pages and word search games on line.  Print them off for a good ice-breaker opener as guests arrive at your party.

Play "Pin the Carrot on the Snowman".  Make a Snowman face (without the nose) on a  large piece of poster board.  Cut out different carrots and let each guest try and pin the nose in the correct place while blindfolded.

Have an "Indoor Snowball" fight.  Have each team make a cardboard fort out of a big box.  Use ping pong balls as snowballs.  Each team must throw their snowballs into the opposing team's fort without the ball touching the ground.  If it does, it's forfeit.  The team with the most balls inside the other team's fort is the winner.

Get creative and have fun!

Snowman Survival Kit Party Favor Tutorial

This is a fun and unique gift or party favor for your Snowman party.  It's pretty easy and simple to make too.

All you need are the following ingredients, most of which you may already have on hand:

Small Oat cylinder container
Carrot
Fleece
3 Large Buttons
5 Large River Rocks
Winter or Snow themed scrapbook paper
12 inches Blue ribbon
Black Spray Paint
Sealer


To start off, find a carrot that is small enough to fit inside your Oats container.  Mine was a little bigger, so I chopped off the end to make it fit.

Spray your Carrot with Sealer according to the manufacturers directions.  Let dry.

While your outside or in the garage (hey, it's Really cold here), spray your River Rocks with black spray paint.  I only sprayed the front, but that's up to you.  I also sprayed mine with the Sealer because I wanted a glossy look to the rocks.

While those are drying, go inside (hey, it's still cold in the garage!)  Cover your oat container with pretty scrapbook paper.  My container was 12 1/2 inches by 6 3/4 inches high.  I ended up cutting 2 pieces of paper in sections that were 6 1/2 inches by 6 3/4 inches.  I used glue and double sided sticky tape to place the paper around the outside of the container.

I then printed and cut out my Snowman Survival Kit labels.  One label is 2 1/2 inches in diameter and the other is 3 1/2 inches in diameter.  (Check out the end of my post, I'm sharing mine with you!)


On the smaller label, I glued one end of the blue ribbon to the back and then wrapped it around the container.  Then, I glued the other end of the ribbon to hold the label in place.


The larger label is glued to the lid of the oats container.


Then, I used a piece of scrap flannel and cut it along the long edge to make a scarf.  I cut about 3 inches up each of the ends to have a decorative effect on the scarf.

Then, I rolled up the scarf with the carrot in the center and placed it inside the container.  To finish off the survival kit, I placed all 5 of the black River Rocks and 3 of the buttons inside a Ziploc bag.


Tadah!! A perfect survival kit for any snowman complete with
 2 eyes, a carrot nose, 5 mouth rocks, a scarf, and 3 buttons!

And now so you can make your own Snowman Survival Kit, here are the printable I used! 
Go and create something sweet!


Snowman Cupcakes

I LOVE, LOVE, LOVE cupcakes.

I don't know what it is about them, but I love them.  The funny thing is--I hate cake.  I really don't like it at all.  There's too much "stuff" and not enough frosting.  That probably doesn't make any sense at all, but I don't know how else to explain it.  But with a cupcake it just seems to be the right proportions....and they are so cute.

You can do just about anything with a cupcake.  You can decorate it to look like anything.  Especially if you use fondant.  I don't like the taste of fondant, so my cupcakes have LOTS and LOTS of yummy frosting on them as decorations.

I wanted to share some Snowman cupcakes that you can make for your own snowman party.  You don't need any fondant skills or fancy machines, only lots of frosting and sweet candy!

Here are a few that the kiddos and I made this weekend:


I was trying to figure out which I liked best to feature on my dessert table so we had to make a few different varieties. 

I love the melted snowman one with his "OH NO!" face in the upper left corner. He's just too cute.  He simply has a marshmallow head with edible markers to draw his face.  I didn't have any pretzels in the house, so we used Choy Mein noodles for arms and M&Ms for his buttons.

The next one on the upper right hand corner was the "yummiest" one for me.  The cupcake itself is really simple.  It is simply frosted with white frosting (we used Cream Cheese because it our favorite flavor)then added some blue sugar sprinkles on top.

I love white chocolate and tried to pipe some melted chocolate into snowflake shapes.  It didn't go too well.  I tried to pipe it with a snipped off end of a Ziploc bag.  I hear all the time how well that works, but it didn't go so well for me.  I think next time, I'll actually try using a decorating tip for a better snowflake.  But it sure tasted yummy!

The next one on the bottom left is a frosted cupcake with a snowman body.  I used some pull apart twizzlers to make a scarf and put it across the upper 2/3 area of his body.  Below that I placed 3 M&Ms for his buttons while above that is his cute face.  There isn't a lot of room to work with up there, so his face was kind of "squished."  But I think it works for him.  His face is made from M&Ms for his eyes, a Mike & Ike for his nose, and 3 chocolate chips turned upside down for his mouth.

The last one is my favorite.  I think this one is the winner.

I frosted the cupcake as normal, but then dipped his face into a bowl of flaked coconuts.  This gave him more of a textured face. 
 Then, I added some leftover spice drops on the outer edges of the center of the cupcake for ear muffs.  To complete the ear muffs, I separated a piece of a pull apart licorice and stuck it in the cupcake just above the gum drops.  I cut the licorice so it was long enough to just lightly rest along the edge of the cupcake wrapper.
For his face, I used green, blue, and brown M&Ms to match eye colors of the guests.  The noses were orange Mike & Ikes.  The mouths are 3 chocolate chips turned upside down and pressed into the snowman's face.  This was a little tricky when the coconut was a little more dense in the center of the cupcake, so you may have to work at it a little.

These cupcakes are really pretty easy, and kinda fun once you get started. 

Snowman Candy Party Favor Ideas

So our Snowman party is well on it's way...
Today I wanted to share a few ideas of some cute party favors for your own Snow party.

The cutest and fastest way to make a candy party favor is to dress up your favorite candy as a Snowman.  The easiest way to do that is to measure your candy and cut a piece of paper to size.  Then wrap the paper around your candy to form a snowman.  Draw a cute face, and WALA! You have a snowman.

If you don't want to try this on your own, here are a few cute ideas we have in our etsy store.

Snowman Hershey Candy Bars


Snowman Hershey Candy Bar Sliders


Snowman Lifesavers


Snowman Gum Head


Snowman Gum Favor


Snowman Notebook


Snowman Hershey Kiss Candy Tent


Snowflake Cupcake Wrapper


Snowman Coaster Set


Snowflake Tutorials and Ideas

To add a little spice to my "Let It Snow" Winter Snowman party, I want to add snowflakes hanging from the ceiling--all over the room!  I plan to attach string to the snowflakes and hang them from the 3m hooks stuck to the ceiling.  Since no two snowflakes can be alike, I have gathered a few different tutorials from some of my favorite bloggers.


These (above) beautiful snowflakes are courtesy of Dawn at "Not Just A Mommy".  She gives step-by-step easy directions (with LOTS of photos) which is great if you need to "see" to understand.


These "crystal" snowflake instructions are from Martha Stewart via Robin at "All Things Heart and Home."  I just love how realistically beautiful they are.  They don't look too hard either, but maybe a little time consuming!


How cute would this Snowflake Garland be over your dessert table?  I love it!  Pattern download and tutorial from "My Cute Stamps".

Snow Winter Subway Art Free Printable

I have COMPLETELY fallen in love with the new trend of Subway art. What a fun, unique "artsy" way to decorate.

So I had to make some Winter Snow subway art for my "Let It Snow" winter party. This will sit so beautifully on the table with all my snowman decorations and bring in a nice touch to the room.

And now, I'm sharing my creation with you! I can't wait to hear how you use this in your winter decorating!


UPDATE: I just had to share the results of how this turned out!  Isn't it cute?  You can't tell but the snowflakes in the corners have a sparkle glitter on them that really shines in the light beautifully. 

LOOOOOVVVVE it!


Let It Snow! Winter Snowman Party Helps

The holidays are over.  The long, dark days of winter are upon us.  Nothing to look forward to?

Invent your own reason for a party and gather your loved ones together for a Snowman "Let it Snow" party. Celebrate winter and the snow with friends, food, and fun!  There's no better way to cheer everyone up and enjoy the season.

To kick off our Snowman party, we are supporting the Moms and Small Businesses of etsy, with some fun and sweet accessories.  Check them out!

'Let It Snow! Snowman Party' by KimsKandyKreations

Don't let the lack of holidays let you down. Celebrate during the long winter days of January. Here's all the details you need to make a spectacular winter snowman party!


Melting Snowman Cookies

$36.00

Jingle Bell Snowlady in Coat

$16.00

Let It Snow Banner

$14.00

Christmas Snowman Hand Paint...

$14.00

SALE - When you purchase 3 ...

$9.75

Frosty the Snowman Novelty C...

$9.50

Frosty the Snowman

$16.50

Double PERFECT CIRCLE Hostes...

$35.00

Snowman Plate and Beaded Kni...

$40.00

handmade SNOWMAN party invit...

$2.50

Snowman-Doodlers(TM) Set of ...

$8.45

6 Detailed Frosty the Snowma...

$4.50

Maro Kits - The Human Snowma...

$11.95

FROSTY THE SNOWMAN -- Bottle...

$3.00

Wired Snowman Napkin Twister...

$5.00

Fondant Cupcake or Cookie To...

$10.95

Generated using Treasury HTML code generator by Whale Shark Websites.