This post may contain affiliate links. When you click on a link, you are supporting DIY Party Mom, my family, and our blog fun. Thank you for your love and support!
Showing posts with label house party. Show all posts

Alice in Wonderland Birthday Party

Celebrate with us and this fun Alice in Wonderland Birthday party.  With all the DIYs, printables, decorations, favors, and fun, you can recreate any part of this birthday party and go down the rabbit hole to Wonderland anytime.

Free Printable Dice Party Favor Box


Our Hasbro Game Night party is just a short time away, so it was time to get in gear with figuring out the party favors and treats.  Since House Party and Hasbro sent us Yatzee to play during the party, we decided to go with a dice themed printable party box.


To go inside the box, we made white and milk chocolate covered oreos.  We are planning to use the oreos for a fun game of Checkers.  If the pieces aren't all eaten as we jump around, they will fit perfectly inside this easy to make box for guests to take home.

The box is super simple to put together.  Simply print out onto card stock and cut around the outer edges.

Score along the inside edges and fold box in.

Finish up by gluing the side edge tabs together.  If you want, you can also glue the bottom together.
See, I told you it was simple!

To save the box, right click on the picture below and save to your computer.  
Go into your pictures and double click on the favor box.  Click Print.
Easy, Peasy!


Monopoly Game Night Serving Dishes

You guys should know by now, that with a new party theme, comes new DIY plates.  For our Hasbro Game Night party, we needed a fun way to serve up the many treats we would be snacking on during the game playing.

What better way than with Monopoly themed serving dishes?

In some ways, these plates were pretty easy to do.  In others, they were a little more complicated than anything I've tried before.

I started out by making myself a template of the Free Parking, Chance, and Reading Railroad designs.  I grabbed the pictures off the internet, added them to my favorite design program and printed them onto card stock.

Then I cut them out and used them as a stencil for each of these plate designs.

The Free Parking plate was a little more difficult since I had the insert pieces in the template.  I thought about cutting out the tire and back window, but was feeling pretty lazy, so I just free handed it.

Then I colored in the question mark, the train, and the car with Sharpie brand markers.  On the Boardwalk and Indiana Avenue plates, I colored the top 1/4 of the plate in a block pattern.  (I did learn the hard way, that it is important to ONLY use Sharpie brand!)

When I was done, I outlined everything in black Sharpie to give it that chunky outline look that Monopoly has.  Then I added the wording to match each of the Monopoly tiles.  It took me a while to get this right, and I'm still not totally fond of my handwriting, but after redoing it several times, I just went with it.

If you find that you mess up too, I learned a pretty cool trick.  Color over your mistake with a dry erase marker and then erase it.  It will erase the Sharpie too!  Pretty useful to know!

When you are all satisfied, bake the plates for 350 degrees for 30 minutes to set the ink.
Now serve up some yummy treats for a great game night party!

New Years Eve Game Night

I've told you before how I HATE New Years Eve.  I'm just not a late night kind of girl.  So this holiday is not one that I usually celebrate with any kind of grace or style.  (You can ask my friends or hubby...I usually just sit in the corner and wish I was in bed.)

But this year, it looks like we'll be spending New Years Eve with family, and I'm a little excited.  Okay, a LOT excited, especially since I won another House Party!  It's a Hasbro game night party, so it's jammed pack full of fun new games for us to try.


So our New Year's eve party this year will be a little more exciting than usual.  To help me get moving in my planning, and to give you a few ideas for your own party, here's a Game Night Treasury from the small businesses of Etsy.

'Game Night' 

Enjoy a fun game night with friends using these party favors, decorations, and yummy treats!

255 Punched 1" and 2&qu...
$3.50
Cake Balls: Bitty Dice
$13.00
Set of 20 Chocolate PLAYING ...
$24.50
Game Night Invitation- Print...
$11.99
Reversible Quilted Cotton Ta...
$17.95
Vintage Salt & Pepper Shaker...
$12.00
Printable Lucky DICE Gift Bo...
$3.50
Monopoly Themed Cupcake Topp...
$21.00
Handmade Scrabble Score Shee...
$25.00
Dominos wine glass charms ga...
$13.00
Scrabble coasters, set of tw...
$12.00
Pine Natural Wood Playing Ca...
$20.00
MONOPOLY Board Game Journal ...
$6.00
Playing Cards and Coins Pain...
$10.00
Clue Game Collage Pocket Wat...
$35.00
Bunco Nite Door Hanger
$24.00

Earn Money Online: House Party


This isn't really a way to make money, but it is a way to enjoy a unique party idea and to get some of the party favors and activities for free.
House Party is a site where advertisers pair with the site to have people conduct parties in their home featuring a specific product.  The advertisers offer you free product, coupons, printables, and party favors to go along with the party.  You invite friends and enjoy a party promoting their product.  Which if you think about it, pretty genius if you ask me.  People are having a good time, socializing, and enjoying the advertiser's stuff.  Aren't you more willing to go tell other's about it after such a great time?  (But I digress...)
To be able to host a party, you need to sign up on their site.  Then, you can peruse the Upcoming Parties link and apply to host the ones you like.  To apply, you simply fill out a form that asks you simple questions to see if you are a "good fit" for the advertiser and party.  Once you hit "submit", you receive a confirmation email and then you wait to see if you've been selected.  If you have, you get another email which you also need to click as soon as possible to be a hostess.

About a week before your party date, you'll receive a box full of fun stuff to help you throw a fun party.

Bicycle Card Party (pre-blog party)

I have been able to do parties for Beyblade, Bicycle Cards, Velveeta, and Hasbro games.  They were all super fun and a good reason to get together with friends for a fun time.  There are LOTS more great House Parties up for grabs right now including a Disney Rush X-box 360 Kinnect party, a Blue Bunny Sweet Freedom party, a Nicholas Sparks party, and LOTS more.

It's a definite WIN-WIN way to throw a party.  You should definitely go check them out HERE if you like to throw parties.

Check out the other posts in this series HERE

Chef Party Luncheon

Despite "Mini-me" being home sick today with the continuation of his asthma flaring up and yesterday's sickness, today was the party.  He was feeling well enough this morning to allow us to run to the store to get the last minute fixins.


To start off I used red tablecloths that I bought from Walmart clearance section at Christmas time.
For the place settings, I used the chalkboard charger I made HERE, a white dinner plate from my kitchen cupboard, and a red dessert/salad plate I purchased from Big Lots.  The napkin rings were the set that I made HERE and I just printed out a red with white polka dot strip of paper to wrap around and cordinate.


For the centerpiece area, I used recipe books from my extensive and never used collection.  On top I used a vase with a strip of cordinating paper around the outside.  I looked EVERYWHERE to find white vases and couldn't find any, so I ended up making these.  Inside the vases, I placed wooden and black kitchen spoons and utensils as decoration.  I used 2 of these on each end of the dinner table.


In the very center of the table, I used a cupcake display tray that I made.  It has a white bowl on a black base.  Inside the bowl, I placed a bed of romain lettuce with various peppers and tomatoes.  It turned out really nice in person!


Because we were moms, we had several small kids at the party too.  I didn't want them to feel like they had to sit on their mother's lap the whole time, so I made a kids table too. (I just forgot to take a picture.)

I took a board and placed it over the ottoman in my living room.  Then I covered it with a matching tablecloth.  This allowed the kids to stand and eat at a table that was just their size.  (I know my kids never like to sit still to eat, so this allowed them to graze on their lunches while they played.)

I set up a huge table for the pot luck food to be placed on. 
Behind the table I used a black sheet table cloth (my favorite you know) as a backdrop.  In the center of the backdrop, I hung the banner sign that I made HERE with "yummy" written on it.

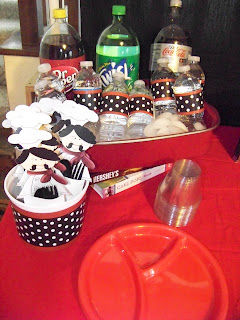
Although I had plates for the moms, I needed them for the kids too.  So I used some divided plates that we use when we go to picnics in the summer.  They were sturdy and allowed the kids to section their food.

I also used the printable that I shared HERE for silverware for each of the kids.  Inside I put a fork and a spoon.  Behind that I put some water bottles and soda inside a bed of ice which was sitting in our Lasagna pan.  The pan was sitting on more cookbooks for height and decoration.

The dessert table was smaller than most of mine because I didn't want it to be the center of attention.  I wanted that to go to the pot luck food table, since this was where everyone else would shine.
This table was a white bedsheet tablecloth with a piece of black fabric from my stash placed on top.
In the front, I hung the "sweets" banner that I made HERE.

For the treats, I made some bite sized Sugar Cookies,

Chocolate Covered oreos with our new white polka dot design,

Cake balls (placed on recipe books for height),
red M&Ms in chocolate bowls,
and chocolate frosted fudge brownies.

One of my favorite parts of the dessert table is the small chalkboard menu cards that I placed beside each dish describing what it was.  These turned out cute and were easy to make!

I did manage to finally finish the party favors too.

I bought oven mitts from dollar tree and inside each I put all the goodies that Philly creme cheese and House party sent me as well as a 4x6 photo book for recipes.

Lastly, we had a table to sit the props on for the Photo booth I made HERE.

I used the same jar that I made for the dinner table and a larger chalkboard sign for directions.

Then the kids had a lot of fun!


And so did the moms!