This post may contain affiliate links. When you click on a link, you are supporting DIY Party Mom, my family, and our blog fun. Thank you for your love and support!
Showing posts with label place setting. Show all posts

🦃 How a Simple Coloring Placemat Saved My Thanksgiving Table

 Last Thanksgiving, my kitchen looked like a cranberry-sauce explosion. The turkey timer was beeping, my mashed potatoes were halfway to glue, and my kids were racing through the living room like wild turkeys of their own.


I remember standing there, gravy whisk in hand, thinking, how am I going to get dinner on the table and keep everyone happy at the same time?


That’s when I spotted the Thanksgiving coloring placemat I had printed the night before. It was supposed to be “just in case,” but it ended up saving the day.


Darth Vader Place Mat Plastic Canvas Pattern

Create an out of this world Star Wars dinner party with this plastic canvas Darth Vader placemat pattern. If you know the basics of plastic canvas, you'll be able to easily sew this Darth Vader plastic canvas pattern and be the hero of the galaxy.

Hocus Pocus Dinner Tablescape

 Have a fun dinner and movie night with your family for your Halloween party with this Hocus Pocus dinner tablescape. It's so easy and cheap to put together, that you'll be sad you didn't party sooner!

Hocus Pocus Dinner Table

Alice in Wonderland Birthday Party

Celebrate with us and this fun Alice in Wonderland Birthday party.  With all the DIYs, printables, decorations, favors, and fun, you can recreate any part of this birthday party and go down the rabbit hole to Wonderland anytime.

Plastic Canvas Easter Egg Napkin Rings

Create some fun and easy plastic canvas Easter egg napkin rings for your Easter table this year.  They are so simple and unique that you'll want to make a set for everyone's Easter basket!

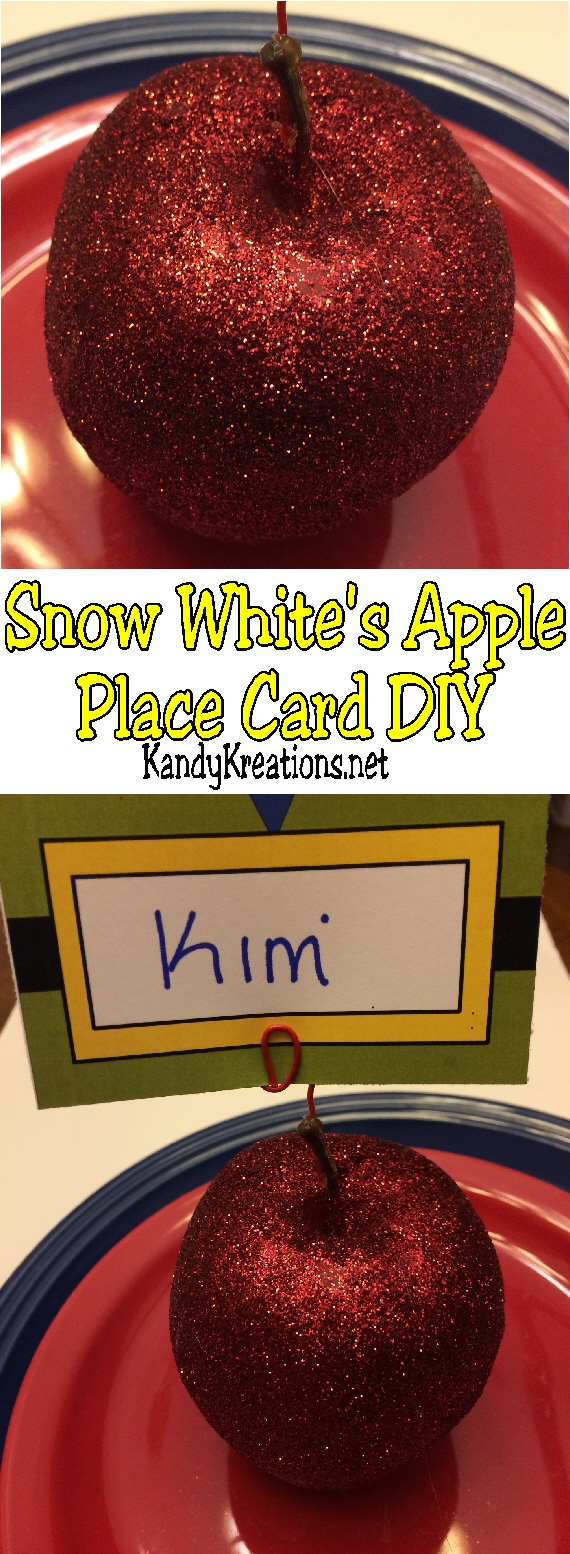
Snow White's Apple Place Card DIY

Decorate for your Snow White birthday party with these apple place card holders.  You can add party food or guest's names to these diy place card settings to make your Snow White party the fairest in the land.

I've been in Snow White fascination mode this week.  I started reading Reflections of Queen Snow White and so I've had fairy tales on the brain.  Thanks to that, I've been thinking it would be fun to have a Snow White dinner party with some friends. 

My goal is to have more dinner parties and friends over this year.  It might be a little tricky with how little our new apartment is and the fact that we are on the second floor so I constantly worry about making too much noise. 

I would love to know how other people do it.  I am always telling my boys to settle down because we might disturb the people underneath it.  I don't think it's fair to them, but what's a mom to do? 

I guess you throw a dinner party and just get the noise complaints over with.  Okay, maybe our dinner parties are more show than noise, but they are fun either way.

I decided if I was going to do this, I needed fun place cards to seat our friends, so I made some Apple place cards that you can DIY too.

Decorate for your Snow White birthday party with these apple place card holders.  You can add party food or guest's names to these diy place card settings to make your Snow White party the fairest in the land.


To make these, you'll need:

Decorate for your Snow White birthday party with these apple place card holders.  You can add party food or guest's names to these diy place card settings to make your Snow White party the fairest in the land.

Start out by painting your apple with regular school glue.  You'll want to be pretty generous in doing so since you'll be pouring glitter on the apple to make it beautiful.

Pour glitter on apple.  I found it was best to do it on a piece of cardstock.  That way you can pour the glitter back into the bottle when done and not waste it.

Decorate for your Snow White birthday party with these apple place card holders.  You can add party food or guest's names to these diy place card settings to make your Snow White party the fairest in the land.

Allow the apple to dry.  While doing that, unbend your paperclip and try and roll it into a pinwheel shape with a tail.

When you're apple is dry, generously use your glue gun to apply to the straight end of the paperclip.  Press on to the back of the apple stem so the circle sticks out the top.

Decorate for your Snow White birthday party with these apple place card holders.  You can add party food or guest's names to these diy place card settings to make your Snow White party the fairest in the land.

Print out your Snow White table cards and cut around the character's edge.  You don't need the extra part if you use them for this project.  Add your guest's names to the table card printable and place into the Apple place card circle paperclip.

Add the Snow White apple place card to your dinner party place setting and enjoy.  If you are worried about the glitter coming off, you can always get a can of clear sealer and seal the glitter in so it won't flake everywhere.


Decorate for your Snow White birthday party with these apple place card holders.  You can add party food or guest's names to these diy place card settings to make your Snow White party the fairest in the land.

Create Awesome Family Time with One Simple Activity


Keep your kids close as they grow older by creating awesome family time with fun themed family dinners.  With a little bit of effort and things you already have around your house, you can create a fun family moment when they will be glad to be together.

Keep your kids close as they grow older by creating awesome family time with fun themed family dinners.  With a little bit of effort and things you already have around your house, you can create a fun family moment when they will be glad to be together.

Halloween Spider Glass and Dishes DIY

Make your own Halloween glass and dishes to decorate your dinner table.  Using this simple technique, the full moons the limit with your Halloween designs.  I chose a fun spider for my glasses and dishes that made the party a little more creepy!

Make your own Halloween glasses and plates to decorate your dinner table.  Using this simple technique, the full moons the limit with your Halloween designs.  I chose a fun spider for my glasses and dishes that made the party a little more creepy!


If you've followed my blog for any amount of time, you've probably noticed that I can be a bit obsessive.  When I find an idea I like, I run with it...and run..and run..and run.  I can't seem to let it go.  My obsession with the candy toppers has to have proven that by now.

I seem to be obsessed with the decorating of plates now.  Remember when I showed you my Back to School plates?  I just had to make a set for Halloween too!  (Yea, you'll probably see a Christmas set too so be prepared.)

Creepy Spider

Spiders seem to be THE scary thing in our house lately. It could be because my husband found this little beauty walking up our front steps the other night.  You can be assured it was several inches across, despite the screaming coming from my husband and kids that it was HUMONGOUS.

So when I started thinking about Halloween themes, I decided to go with Spiders.  Dear Hubby may not appreciate it, but it seemed appropriate.

Make your own Halloween glasses and plates to decorate your dinner table.  Using this simple technique, the full moons the limit with your Halloween designs.  I chose a fun spider for my glasses and dishes that made the party a little more creepy!
I started with a goblet from Dollar Tree.  They had lots of different sizes and colors, and as tempted as I was to go with the black stemmed one, I wasn't sure it would show the design to the greatest effect.

Make your own Halloween glasses and plates to decorate your dinner table.  Using this simple technique, the full moons the limit with your Halloween designs.  I chose a fun spider for my glasses and dishes that made the party a little more creepy!
I measured around the top of the glass and marked it with a dry erase marker.  I wanted the design to be pretty even at the top.

Make your own Halloween glasses and plates to decorate your dinner table.  Using this simple technique, the full moons the limit with your Halloween designs.  I chose a fun spider for my glasses and dishes that made the party a little more creepy!
I drew lines down the sides of the glass to the bottom using a black Sharpie Oil-Based Medium Point Paint Marker.  I wasn't very straight with my lines, but if you catch it VERY quickly, the lines are forgiving.

Make your own Halloween glasses and plates to decorate your dinner table.  Using this simple technique, the full moons the limit with your Halloween designs.  I chose a fun spider for my glasses and dishes that made the party a little more creepy!
I followed up by connecting the lines in a large draping shape.

Make your own Halloween glasses and plates to decorate your dinner table.  Using this simple technique, the full moons the limit with your Halloween designs.  I chose a fun spider for my glasses and dishes that made the party a little more creepy!
I then drew different sized spiders all around the glass spiderweb.

Make your own Halloween glasses and plates to decorate your dinner table.  Using this simple technique, the full moons the limit with your Halloween designs.  I chose a fun spider for my glasses and dishes that made the party a little more creepy!

I finished the glass off by baking it in the oven for 30 minutes at 350 degrees.

Make your own Halloween glasses and plates to decorate your dinner table.  Using this simple technique, the full moons the limit with your Halloween designs.  I chose a fun spider for my glasses and dishes that made the party a little more creepy!

I also made a set of matching square plates to complete my Halloween tablescape.
I am SUPER excited with how they turned out and the cheap, ease of custom Holiday plates and dishes.
Can't get better than that?!
Summer Fun Watermelon Placemat Printable


I've had the idea for a Printable Dry Erase place mat for quite a while now but haven't really had the excuse to make one.  None of the parties I've done lately have had a sit down dinner and while our BBQ really isn't a sit down type of activity, I thought this dry erase place mat would be perfect to help keep the kids busy while we finished up the hamburgers and hot dogs for dinner.


And the great thing is it's a SUPER quick and easy project.


Simply save and print out the graphic above by right clicking on it and hit "save".  Then go to wherever you saved it and double click on the picture.  It should bring it up in a separate window.  Click the "Print" button at the top and select your printer.  Be sure to change the paper size to "legal" and hit print.

Now you can either let the kids play with the place mats and some crayons, or you can laminate the place mat to make it dry erasable and reusable.

Either way it's a quick and easy way to keep the kids busy while you finish dinner.  
  I can't wait to try them out this week at Mini Me's birthday!  And soon, hopefully, I'll have a few more of these available for different themes.  Do you think you would use them?

Stamping on Plates

White plates are probably one of my most used party staples.  They fit almost any theme and color scheme, so you can buy one set of plates and use it multiple times.
Sometimes all it takes to tie your plates into your theme is a simple color, but other times, it's fun to add a little whimsy and fun to the plates.
Use those fun stamps that you can find at Jo-Anns, Michaels, and Hobby Lobby for only a dollar on your plates to add another layer of your theme to your dinner table.

Start with a white plate, some food markers, and some new stamps.  (You don't want to use stamps that have been inked with regular ink since you'll be eating off these plates.)

It's best to use stamps that are bigger and not too detailed for this project.

There are several types of food markers you can use.  Wilton has a good set of Food Writer Edible Color Markers, while Ateco has a fun set of 10 Marker Style Food Color Kit markers that I'm longing for.

Use your food color markers to color in your stamps in a thick layer of edible ink.  Your ink will start to dry so work quickly.
Carefully place your inked stamp on the plate and press firmly.

This would be fun to use with alphabet stamps to spell guests names out as a place setting too!  Your guests will be amazed at this simple trick and WOWed at your table.

Back to School Ruler Place Mats


Looking for a quick and easy way to spice up your Back to School table?  These Ruler place mats are perfect for a fun and useful decoration.

I started with these yellow Stiff Foam Sheets I found at Hobby Lobby.  These sheets are 18 inches long by 12 inches wide and VERY stiff.  They weren't with the other felt sheets at Hobby Lobby.  They were actually on the back of that aisle, but should be in the general area at yours.

I placed the felt on my work area which is covered with a big cutting mat.  Using a bottle of Black Dimensional Fabric paint, I used the lines on the mat to draw my ruler marks on my felt.

This only took about 3 minutes to draw both sides.  I haven't decided whether I want to leave it like this or add the numbers, or not.  I'm leaning towards no numbers for the clean look, but am open to suggestions if you have any.

After giving it a "while" to dry, I used these with my Chalkboard menu chargers to coordinate and spice up my Back to School party dinner table.

Quick and easy and super cute!

Shout Out Sunday

Here's a few fun party ideas from around the web...
Michelle Paige shared these Puppy Pop place markers.  These little puppies are a fun way to add both a treat and a place marker to each setting on her cute Puppy party.  I love how simple the idea is but how wonderfully it ties her theme together with each party plate.  VERY CLEVER! Her dessert table with all the fun puppy themed food is so cute too, and definitely worth checking out.

The Country Cook shared her Oreo Puddin' Poke Cake. I admit, I'm almost afraid to try this cake...it looks so yummy that I can see myself making it all the time.  Since I'm getting ready to go back on the "exercise and diet" bandwagon, I'm leery to try it.  But it looks so delish.  I definitely added it to my Recipes pinboard to make this weekend for our Sunday family treat.
Elizabeth Andree shared this fun Yarn Bowl.  This bowl would fit great at an art or game party.  I can see it filled with party favors or gifts.  It's made from old leftover yarn pieces for a recycled, cheap centerpiece but would be so unique that it would certainly be the talk of your party.

The Exchange shared a Christmas Craft Party. I love the idea of this party. It's so fun and a great way to get started on your Christmas crafts and gifts. What's better than to get all your girlfriends over for a fun get together and crank out a few great projects? So clever!

Haute to Sew shared how she made these Chair Covers.  These covers seem pretty easy to make, which is perfect if you need to make ALOT of them.  I love the idea of adding some fun accents or making them out of some fun fabric to match your party theme.  Such a GREAT idea.