Have a fun dinner and movie night with your family for your Halloween party with this Hocus Pocus dinner tablescape. It's so easy and cheap to put together, that you'll be sad you didn't party sooner!
This post may contain affiliate links. When you click on a link, you are supporting DIY Party Mom, my family, and our blog fun. Thank you for your love and support!
Showing posts with label centerpiece. Show all posts
Showing posts with label centerpiece. Show all posts
Sock Hop Jukebox Candy Bouquet Tutorial
Make a fun Sock Hop candy bouquet using this simple tutorial. With step by step directions, you can make any type of bouquet for birthdays, holidays, or any gift occasion.
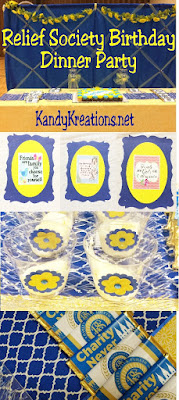
Relief Society Birthday Dinner Party
Come celebrate the Relief Society's birthday with us! We have delicious food, diy party decorations, great party printables, and a sweet dessert table. Find out how we did it with all the details so you can celebrate too.
The women's organization in our church turns 175 years old this year. It's a wonderful organization which does so much good world wide and in our tiny little area of the country. I am thrilled to be a part of the service and good works these women do. And I'm super excited to have been put in charge of the birthday party in our area.
Our little party planning group decided to make our birthday celebration into a dinner party before the worldwide women's broadcast that our church shows. We hoped that each would boost the attendance of the other and it would be a good chance to get together and socialize.
We chose to have Taco Salad since it was a low key meal and everyone loves it here. That allowed us to spend more time and effort on the decorations, which is my favorite part of the party.
The Relief Society colors are blue and gold, so those were the two colors we interlaced into all our party decorations. I found some super cute fabrics at Hobby Lobby and purchased a bunch of it on sale. I was able to get three large yellow table cloths and three blue table runners for the large tables, and then reversed the color scheme for the smaller tables. I used this DIY table runner technique to finish off the fabric and make it really pop.
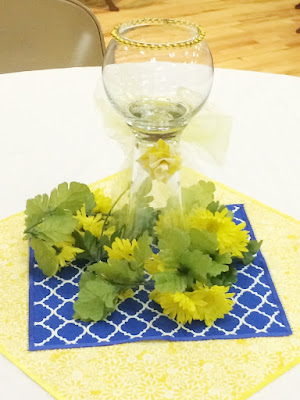
We also set up several round tables for the ladies to sit at. Each one had a white table cloth with yellow and blue squares in the center. The large yellow square was 18 inches and the smaller blue square was 11 inches. I layered them on top of each other at angles to give some dimension and interest to the centerpiece.
On top of the squares I created some glass minimilstic angels since we were going with flowers and angels as our theme. I added a little more yellow to the angel by using the ribbon scrap flowers that I made here. Then at the base of each angel I placed some yellow vine flowers I found on sale at Hobby Lobby.
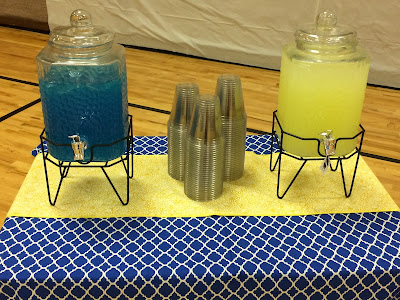
One of the small tables was used as a beverage table. We had two one-and-a-half gallon beverage containers. One was lemonade and the other had a mixture of blue Hawaiian punch and 7-up. This kept the color scheme going and both were super yummy.
The other small table was our giveaway table. We decided since it was our birthday we needed to give away a gift for everyone who arrived on time. We hoped this would help people come and arrive with enough time to be able to enjoy the food before the broadcast began.
The table had a beautiful carved box that I was given by a dear friend years ago, another glass angel to match the dinner tables, and our giveaway basket. We found a cute yellow bucket from the Spring line at Hobby Lobby and added a "Friends are God's Way of Taking Care of Us" printable to a 9x12 inch tile, a box of beautiful yellow note cards, a friends picture frame, a bottle of lotion, and some super yummy truffles from Nillsons Confections here in South Carolina.
We ended up using 2 tables for food and one table for the desserts. I used a 8 foot PVC pipe backdrop that I showed you how to make here. I have since learned to cut the pipes into 2 inch lengths and use connectors if needed so I can make the backdrop as big or as small as I needed. It works great since I don't have these huge pipes tripping everyone in my party closet but instead can store them quick and easy.
The backdrop is a blue cheap fabric that I found at Walmart. To bring the yellow in, I crisscrossed yellow tulle at angles. Where the tulle met, I added ribbon angels that I made here. Then we draped some of the yellow flower vines from around the tables onto the top of the backdrop.
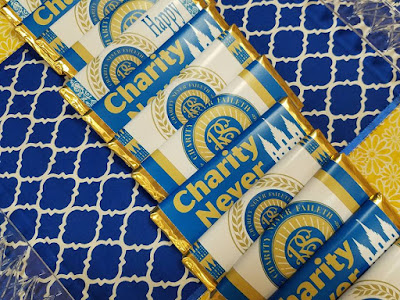
A few years ago, I shared 4 different candy bar wrapper printables for the Relief Society birthday. I printed them out and used gold foil to make the blue pop. The candy bars lined down the sides of the dessert table in between the ice cream cups.
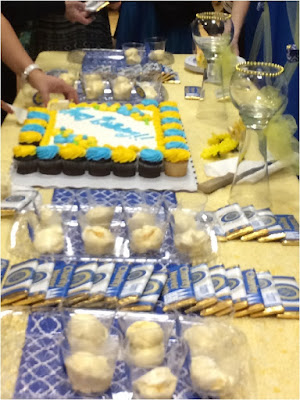
We decided to pre scoop the ice cream into little cups so we wouldn't have to worry about it during the birthday party. I was a little nervous about how this would go especially since I couldn't find cute yellow and blue cups that were in our price range. So instead I bought a pack of clear cups and used my 1-7/16 inch scallop punch and my 1-1/4 inch flower punch to cut out blue and yellow flowers. The larger flower is on plain blue cardstock, while the yellow flower has different patterns on it. Then I placed a blue gem in the center and glued it to the front of the cup.
I scooped the ice cream the morning of the party and placed them on baking sheets in the freezer. Since I made sure to push the ice cream down below the rim, I layered the baking sheets on top of each other to avoid worry about freezer burn. We kept the ice cream in the freezer until after the food was done and we were ready to cut the cake. Then, we brought it out and layered it on the dessert table.
I never got the best picture of the dessert table but it turned out pretty cool with 2 angels and more yellow flowers at the back of the table and the yellow and blue birthday cake front and center.
Then I used large pieces of blue and yellow cardstock to create frames to hang on the table clothed walls. The printables that I hung in the frames (and in the gift basket tile) all are available in my printable shop.
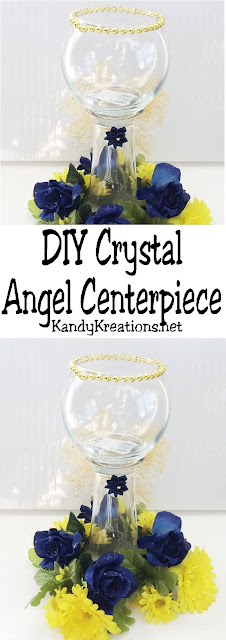
DIY Crystal Angel Centerpiece
Do you need a quick, cheap, easy, but elegant, beautiful centerpiece for your next party? This angel centerpiece is perfect and can be made in just a few minutes for a spectacular addition to your table.
One of the projects that I'm currently working on is a birthday dinner for all the sisters in our church. We are celebrating the 175th birthday of our women's organization and decided to go with an angel and flower theme.
In setting up the tables, we knew we needed to come up with a simple, easy, yet beautiful diy centerpiece for all the dinner tables.
We created these beautiful angels for each of the tables. The colors of our women's organization are blue and gold, so that's the color scheme. I think they are going to look so beautiful on each of the tables and add a little bit of elegance to our dinner.
If you need a quick and easy DIY angel centerpiece, these are SUPER easy to make.
- Tall vase (mine was from the glass section at Dollar Tree)
- Circular globe vase (also from Dollar Tree in the candle section)
- 6 inch wide tulle
- beads (mine were from Mardi Gras beads I found at Walmart)
- small flowers (find mine at Jo-Ann Fabrics)
- flowers in green vine
- coordinating flowers free of vine
- glue gun
Start by securely gluing your globe to the upside down bottom of the tall vase. This creates the body of the angel.
Using several feet of tulle, tie a bow and glue it to the back of your angel. This bow is about 2 feet in length, so the more length in your bow, the larger the angel's wings are going to be.
On the opposite side of the bow, glue your small flower to the front of the angel.
Measure the top of your globe vase and cut a piece of your beads the same size. Add a little bit of glue to the last bead and secure it to the other end to create a small circle. The halo should be the perfect size to sit on top of the angel's head.
Using the flowers on the vine, wrap around the base of your angel and trim. Secure the length into a circle. Add the free flowers in the holes of the flower base to create a beautiful flowered base for your angel center piece.
Ta-dah! You're done and have a quick and easy but super beautiful and elegant Angel Centerpiece for your next party.
And if you have a son who can't tell what the centerpiece is supposed to be, you can always add a face to your angel! (Ugh....I thought I raised him better. *grin*)
How to Make a Banana Split Candy Bouquet
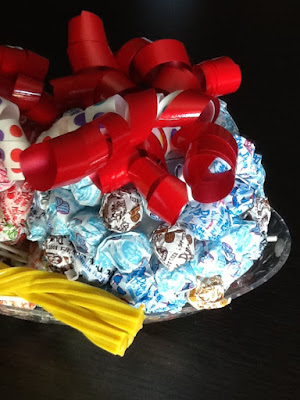
Surprise someone with this Banana Split DIY Candy Bouquet as a birthday gift or as a centerpiece at Ice Cream party this summer. It's an easy diy project and so much fun to eat and enjoy using simple ingredients like Dum Dum candy suckers, Styrofoam balls, ribbon bows, Twizzler candies, and an ice cream candy dish.
I love to make candy bouquets for just about every occasion. They are the perfect gift for everyone because who doesn't love candy and they won't get stuck in the back of the closet waiting to get regifted!
While thinking about the centerpiece for my Ice Cream housewarming party next week, I thought it would be perfect to make a Ice cream sundae candy bouquet. But after looking around and starting to gather supplies, my sundae became a banana split with 2 scoops. (Don't you just love how projects have a tendancy to evolve on you while you're working on them?)
But who doesn't love 2 scoops instead of one when it comes to Ice Cream? Or candy?
To make a Banana Split Candy Bouquet, you'll need:
- 300 count package of Dum Dum suckers
- 2 4 inch Styrofoam balls
- 1 package of yellow Twizzler candies
- 2 red bows (Found mine at Dollar Tree)
- 1 large serving dish (also found at Dollar Tree)
- a pair of scissors
Start by seperating the dumdum candies into different colors. This wasn't easy since the colors were a little subjective on some of the candies, but I let my 11 year old do it and they turned out pretty good.
Find out which colors you have the most of. I ended up with red, purple, and blue being the majority of my sucker colors.
Choose one of the candy colors to focus your "ice cream scoop" on, and trim the sucker sticks at the bottom of the candy wrapper.
Start by pushing the sucker sticks into the center of one of the 4 inch Styrofoam balls. Continue around the center of the ball in a line. (It will kind of look like one of Saturn's rings!)
Once that ring is complete, move up a row and make another ring until you reach the top of the Styrofoam ball or run out of color. I was able to complete about 4 rows with one of the colors, the second I added some of the brown suckers in to look like chocolate chips to complete the rows, and completely fill the top half of a third ball in another.
Add the ribbon bow to the top of the empty space on your sucker balls.
Now it's time to assemble your banana split. Start by adding some of those non-matching colors to the bottom of your banana split bowl. These will help you balance your "ice Cream" balls. Place the candy filled Styrofoam balls side by side on top of the sucker base. It may take some doing to balance them depending upon the size of your scoops and the banana split bowl.
Remove three of your yellow Twizzers and place on each side of the banana split bowl to resesemble bananas. Now add a little bit of party fun, and enjoy your Banana Split Candy Bouquet!
Who would you give this yummy candy bouquet to?
Dinner Party Ideas from SNAP Conference
Enjoy some awesome party ideas from SNAP conference. These dinner party and lunch party ideas show that it's easy to throw an amazing party if you think outside the box and use simple and beautiful table scape ideas. Companies like Chinet, Micheals, Oriental Trading and Get Away Today show you how.
Last month, I was able to attend SNAP Conference out in Salt Lake City. While I learned a lot, about blogging and social media, one of my favorite parts of the conference was the parties and meals. Maybe it's the fact that I'm a party lover, with a special love of intimate dinner parties, but I loved each meal that we were able to enjoy at SNAP. Breakfast, lunch, and dinner were all sponsored by different companies who all went out of their way to throw some amazing meals with fun decorations to keep the conference fun and engaging.
I wanted to share with you my favorite dinner party ideas (and lunch too) from the parties of SNAP so hopefully you can see that you don't have to spend a fortune to make a great party, just a little bit of creativity and fun.
The center of their plate had a plate printable, much like what I have been creating for my Dollar Tree plates. It was a simple circle with the theme of their dinner party "invite" on the center. Underneath the plate they used black and white striped paper and a pink napkin to add a bit of pop.
Chinet also added a little bit of pizzaz to their silverware by dipping them in paint or spray painting the silverware bottoms. I really liked the look, but we all ended up with colored fingers after using the silverware. So maybe try adding a sealer if you're going to do this at your next dinner party.
One of the lunches was a travel theme with the company Get Away Today. I loved how fun and simple their centerpiece was.
The center of the table had a beach pail with several mini beach balls. Surrounding the balls were luggage tags in a palm tree theme. This was super cool since it combined both their party favor take away with their table scape. Even the beach balls had a simple sticker with the party theme on it to remind guests to get away and enjoy the meal.
It wouldn't take much to replicate this party idea for a beach party or summer picnic using your local Dollar store. It's simple, but remarkable with a fun take away.
Oriental Trading Company also put together a fun lunch for the conference attendies. Being a party company, they had a fun idea with pops of color using paper streamers and paper balls of different sizes. All of this was sitting on a black and white striped fabric table runner.
The plates were sitting on the table in matching colors of pink and blue. The napkins matched the stripe of the table runner and the party favor flamingo suckers were sitting in the center of the plate to add a little more pop of color and sweetness.
Micheals Craft Store crafted the last dinner party of the conference. The theme was very elegant with golds and pinks. The center of the table was understated and elegant.
The centerpiece had a simple mason jar painted gold, with a taller glass vase holding a small arrangement of flowers. All of this was sitting on a spray painted picture frame to keep the centerpiece together and arranged.
The table setting each had a different piece of scrap book paper for the white plate and silverware to sit on. I think using the scrap book paper for place settings may be an upcoming trend in the party world. That's such a simple but fun idea since it's easy to replicate for just about any theme.
I am so thrilled that I was able to attend SNAP conference. The parties alone where worth being away from my family for those few days. I'll try and share them with you this week, so you can see why and get some great ideas for your next get together.
Create Awesome Family Time with One Simple Activity
Keep your kids close as they grow older by creating awesome family time with fun themed family dinners. With a little bit of effort and things you already have around your house, you can create a fun family moment when they will be glad to be together.
Make Cinderella's Dress Maker Book DIY
If you're having a crafting party or Cinderella birthday party, add Cinderella's dress maker book as a perfect dessert table or party centerpiece. This easy DIY will help you create one in moments with an old book and two free Cinderella's dress pattern printables.
St Patricks Day Table

I'm putting all my St Patrick's Day finishing touches on my dinner table today to get ready for tomorrow and thought I'd share with you a sneak peek.
I started with this fun shamrock table runner that I designed and sew from plastic canvas. It spreads out over the center of the table and adds a fun touch of green to the base of the table design.

I added gold accents in with these Dollar Tree candle holders that I sparkled up with some glitter and Modge Podge.
I absolutely LOVE this flower centerpiece and it was VERY easy to do. I bought a Leprechaun hat at Dollar Tree and placed a vase full of green and white flowers from my local grocery store. They look so beautiful in the center of the table and smell really good too!

Each place setting got a gold charger, a St Patricks Day plate, and the fun beaded silverware that I made.
I also added a Dollar Tree mug to each place setting with the Leprechaun beard printable I shared for a fun touch.
Tomorrow before dinner, I'll finish the Pistachio pudding and fill it to each of these Leprechaun hat candy cups for dessert.
A super simple but dramatic St Patricks day Dinner table!
Soccer Cookie Bouquet
Happy 1st day of March! I just learned that this is National Craft Month. How fun is that? So I wanted to share an EASY but high impact craft with you today in this yummy Soccer Cookie bouquet.
Supplies needed:
Fish bowl (Walmart Glass Aisle)
Styrofoam ball (a little smaller than the size of bowl opening)
Aluminum Foil
Hershey Drops (or other fun candy)
Cookies on Stick
I made my cookies the day before using Sugar cookie dough and baking long sucker sticks into the bottom of the cookies. I used a 2 inch circle cutter and pennant, jersey, and star cookie cutters.
Since I don't like the taste of Royal Icing, I melted (10 seconds in microwave) a little Betty Crocker canned frosting and used some icing bags to pipe the frosting on the cookies. The frosting was runny enough to frost, but hardened up pretty nicely.
Cover your Styrofoam ball with aluminum foil. I left a little open on top so it would be easier to place the sucker sticks in. I did find it was easier to slice off a piece of your Styrofoam ball so it would sit flat in the bowl.
Place the ball down inside the bowl in the center.
I used Hershey drops and Cookies and Cream drops for the candy in my cookie bouquet. I figured this looked more like the black and white of a soccer ball. It would also work good with M&Ms or other small pieces of candy.
Carefully put your pieces around the outside of your Styrofoam ball. Try and cover all the aluminum foil from showing, but leave the top party open.
Start placing your cookies into the Styrofoam by carefully pushing the stick down.
I like to start with a center piece and build out from it. Since I am a very symmetrical crafter, I like to have it pretty even with the same cookies on each side, but it's all up to you. Place them in there the way YOU like.
You might have to trim down the sticks for the cookies in the front. That's okay. They cut pretty easy with a pair of scissors.
One you have all your cookies in, add a few more of the chocolate drops into the top to cover the Strofoam and hide the stick bottoms.
Now you have a pretty easy and yummy treat for a gift or party centerpiece!
Subscribe to:
Posts (Atom)


